Image optimization and compression: tools, tips and tricks
 Optimizing images for web you’re making your web site load faster. Visitors don’t want to wait much. In addition you reduce bandwidth usage and consequently your bills. The more visitors your site or blog gets the more important is to optimize and reduce image size. Understanding basics of image compression and which formats to choose lets you not only significantly cut down on image size but even improve image quality. In addition, interactive flash projects (especially banners limited in Kb size) are where image optimization could have the most immediate and practical impact.
Crop out excess white space
Sometimes you have extra space or padding around graphics so that they don’t touch accompanying text or web page elements. Instead, crop out that space and use CSS to create the padding around the graphic.

Resize images in Photoshop not in browser
Don’t use HTML or CSS properties to resize images within the browser, instead resize your images in Photoshop or other software exactly to the dimensions you will use on your site.
Choose the right format
JPEG is the format for photos. JPEG can contain millions of colors and it has great compression. Most cameras store photos in JPEG format. It’s a lossy format (important! 100% quality doesn’t mean lossless), so you lose quality with every edit. JPEG doesn’t support transparency.

GIF is the format for animations. GIF is a palette (also called “indexed”) type of image. It contains up to 256 indexed colors. GIF is a lossless format, which means that when you modify the image and save it, you don’t lose quality.GIF is now used more for “loading…” animations instead of blinky banners in the past. GIF also supports transparency: a pixel in a GIF image is either fully transparent or fully opaque.
PNG 8 is the format for logos, illustrations, icons, buttons, backgrounds, graphs. PNG8 is a palette image format with lossless compression, just like GIF. Unlike GIF, PNG 8 usually yields a smaller file size and supports alpha (variable) transparency (semi-transparent pixels appear as fully transparent in IE6).

PNG 24 is used when you need alpha transparency and more than 256 colors. PNG 24 is also the only one choice when you need superior image quality and file size isn’t important for you. PNG 24 size is usually bigger than PNG8 and JPEG. Truecolor PNG 48 is a lossless compression type that can have millions of colors (16 bit per channel) and can be perfect intermediate for the multiple edits.

Use Save for Web instead of Save as in Photoshop
Save for Web command in Photoshop (Alt+Shift+Ctrl+S) is provided for optimizing images to desired size/quality. In addition to providing fine tune control and preview to experiment with image file sizes and quality, Save for Web command in Photoshop tries to reduce file size by stripping out al unnecessary metadata information as well as image preview (which can double file size).
Use fewer colors for indexed images and try Local (Selective) palette
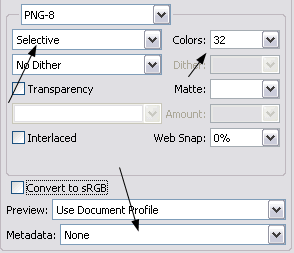
If you’re optimizing icons, buttons or other artwork in PNG8 try to reduce colors numbers down to 32 or 64. Often you will cut out image file size significantly without decreasing visual image quality. Using the selective palette lends itself better to blockier pixels which make image compression a lot more efficient as compared to Perceptual or Adaptive palettes which tend to be too diffuse.

Convert PNG to Grayscale if you don’t need color
Set Grayscale color mode in Photoshop (Image ->Mode->Grayscale) for images prior to saving them in PNG. It can save you some Kb, especially for semi-transparent images.

Try PNG 24 instead of PNG 8
Sometimes small size images or gradients actually compress better as PNG 24 than PNG 8 because of the way that the lossless compression algorithms work and the overhead that a color index adds.
Use Posterization to reduce number of colors in PNG
Posterization reduces the amount of colors, converting similar colors to the single one. To use this technique apply Image->Adjustment->Posterize with the amount of Levels around 40 before saving image. Watch out: color alternation is possible, especially if you’re trying to stitch image with a HTML background. Included in free Photoshop action to optimize images for Web.
Remove dirty transparency to optimize PNG image
This technique helps to remove all hidden data in a transparent area to reduce file size. It works not with every image well so try to experiment. Ctrl+Click on image thumbnail in Layers palette to create a selection, then invert it: Select ->Inverse. Switch to Quick Mask mode by pressing Q key. Refine selection to include only transparent pixels by applying Image->Adjustments->Threshold (amount 255). Exit Quick Mask mode by pressing Q again and fill the selection with black. Invert the selection again and add mask. You can reduce the PNG image size by more than 50% using this trick. Included in free Photoshop action to optimize images for Web.
Avoid saving JPEG as Progressive
By saving JPEG in Progressive mode Photoshop adds multiple copies of the image at lower resolution to make the image appear quickly on the screen, while progressively improving in quality. While sometimes it can give you slightly lower file size, most of the time the file size will be bigger. Progressive JPEG files are not displayed on many mobile devices.
Use Eight-Pixel Grid to optimize JPEG image
JPEG image consists of a series of 8×8 pixel blocks and each block is optimized independently when image file is saved. Many advanced utilities for JPEG optimization have selective optimization feature which lets you apply different quality in different image regions. Align the image with the eight-pixel grid before saving (especially rectangular objects) and you will cut the file size down improving image quality at the same time.
![]()
Reduce noise to decrease image size
Noise requires from JPEG algorithm add more recourses to store it leaving less space for really useful information, i.e. image itself. It means by eliminating noise you will not only decrease file size but improve overall visual look of the image. You can use a number of different Photoshop plugins such as Noise Ninja or Imagenomic Noiseware professional. The easy way to reduce noise in Photoshop is to change color mode to Lab and then apply Filter->Median (2-4) to Channels a and b. Included in free Photoshop action to optimize images for Web.
Blur the background
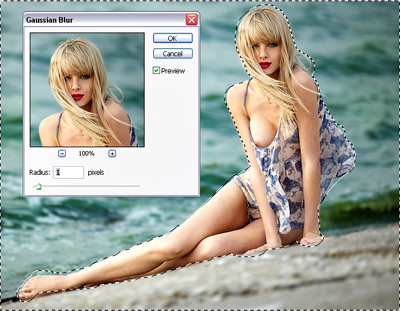
Blurring the background of a JPEG image helps the JPEG compression engine to make the image smaller. Because of the way JPEGs are compressed, blurred images will be smaller than non-blurred. To use this technique Select your main object, Invert the selection by pressing Ctrl+I, apply small amount of Gaussian blur (1-2px). Now you can save your image as JPEG with smaller file size.

Add blur when Saving for Web
Because the JPEG compression algorithm has an easier time when compressing areas with subtle transitions in colors and tonal range, adding a small amount of blur (0,2-0.3) to your images can help reduce file size. Decreasing Saturation and Contrast slightly can also have a good impact on the size of JPEG images.

Use special tools to optimize images further
There’s number of excellent online tools as well as downloadable utilities which can help you greatly reduce your images file size without any loss of quality. Most of them don’t have any settings you just need to point these tools to your image folder or website and get optimized processed images.
Smush.it is online tool that uses optimization techniques specific to image format (PNG, GIF, JPEG) to remove unnecessary bytes from image files without any loss of quality. You can use Smush.it as a part of YSlow Firefox plugin or WordPress plugin.
punypng
punypng uses several web optimization techniques to reduce the file sizes of your images including choosing and converting to the best image format. Punypng developers claim that it is currently more efficient than Smush.it.
PNGSquash
PNGSquash is a lossless PNG compressor app for OS X that combines the top PNG compressors (PNGCrush, OptiPNG, AdvPNG, and PNGOut) into a streamlined interface for quick and effective compression.
PNG Monster
PNG Monster is a PNG compression GUI designed to very easily lossless compression of large numbers of PNG files automatically with the lowest possible file sizes. PNG Monster uses a variety of command-line applications (PNGRewrite, PNGCrush, OptiPNG, PNGOut, AdvPNG) compressing with slightly different compression methods.
SuperPNG
SuperPNG is a free Photoshop plugin for saving significantly smaller PNG files compared to Photoshop’s native save feature for PNG’s. It also includes some advanced PNG-creation features such as 16-bit color support, variable compression, gamma correction, and metadata saving.
SuperGIF
SuperGIF is a free drag and drop utility for Windows and Mac OS users that optimizes your GIF images. it can compress GIFs 50% more in some instances. The free version can only compress one GIF at a time (no batch processing).
jStrip
jStrip is a free tool to reduce the file size of JPEG images without sacrificing image quality. jStrip works by removing unneeded data from JPEG files without quality loss or recompression.

One thought on “Image optimization and compression: tools, tips and tricks”